
| Title: | Reversing a Misapplied Dues Payment that has been Updated to History |
| Submitted by: | Rapattoni Software Support |
| Issue: | How can I reverse a misapplied dues payment after the Member History Update has been run? |
During the hectic dues season, it is easy to misapply a payment to an incorrect member. Prior to running a Member History Update, this is easy to fix by voiding the cash or check receipt or issuing a credit on the credit card receipt.
However, once the Member History Update has been run, the member’s billed status is changed to ‘P’ for paid and the misapplied dues are reflected in their Dues History Form. You will need to reverse the charges in the incorrect member’s A/R, create a new invoice, pay off the correct member and then run the Member History Update again. This may sound a little tricky but as long as you follow all of the steps listed below you will be successful.
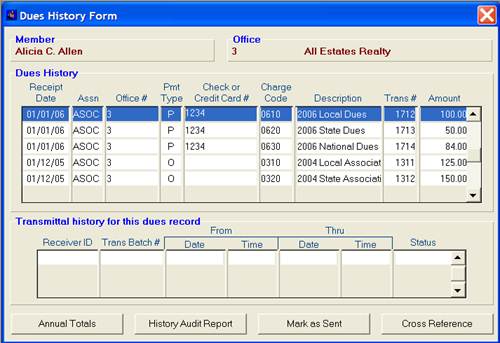
For example, if you apply a dues payment to Alicia C. Allen, and then run the Member History Update, Alicia C. Allen’s Dues History Form will look like this:
But, you meant to apply the payment to Paula Allen instead of Alicia C. Allen, so you will need to adjust Alicia C. Allen’s A/R and Dues History Form.
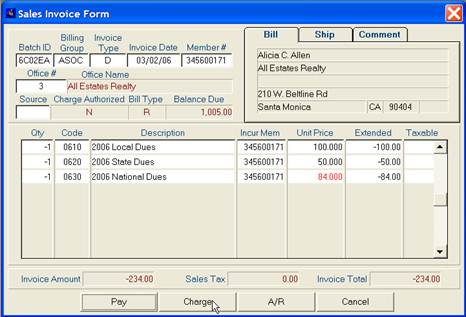
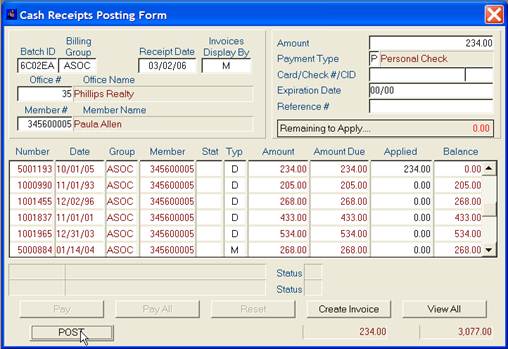
1. Using today’s batch, create a negative dues invoice for the member you misapplied the dues to (Alicia C. Allen). The invoice should include all applicable dues charge codes with a negative quantity (-1) in each amount field. Charge the invoice to the member’s account.
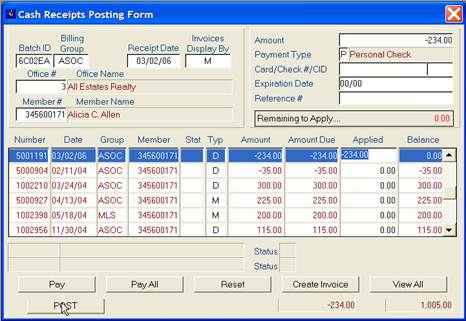
2. Apply a negative receipt to the negative dues invoice using today’s batch.
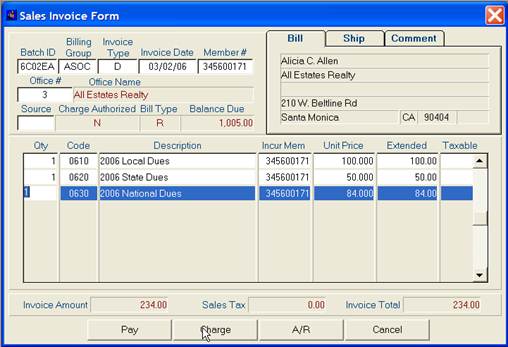
3. Since Alicia C. Allen still needs to pay her dues, you will need to create another positive dues invoice and charge it to her account.
4. Now you’ll want to correctly pay off Paula Allen’s dues invoice using today’s batch.
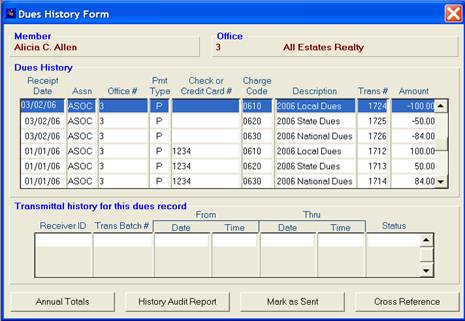
5. After the Member History Update is run again, Alicia C. Allen’s dues history reflects the negative amounts, which cancel out the misapplied payment:
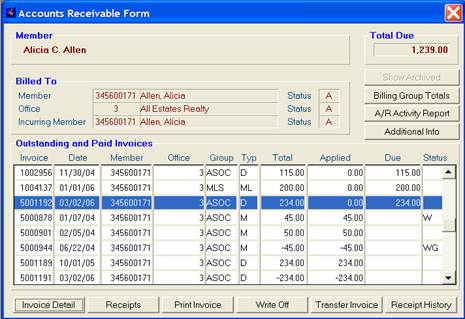
And a new outstanding dues invoice displays in Alicia C. Allen’s Accounts Receivable Form.
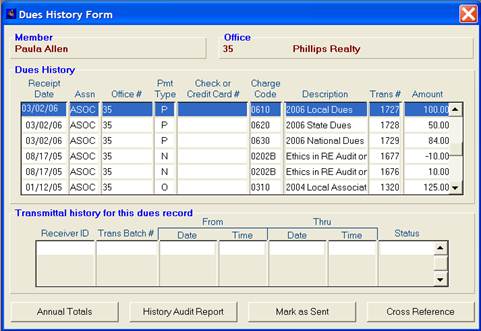
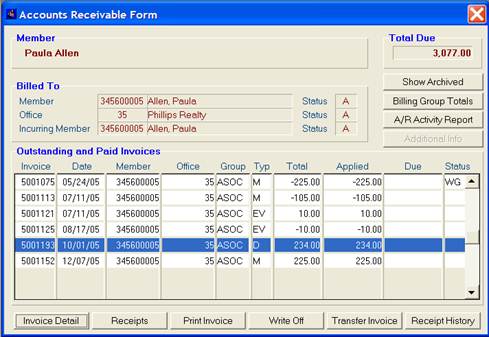
Paula Allen’s Dues History now correctly shows her paid dues:
And Paula Allen’s Accounts Receivable Form will show her dues invoice as paid.
By following these steps you will effectively correct misapplied dues payments while leaving a valuable audit trail.
If the payment was done via a credit card, the steps vary slightly.
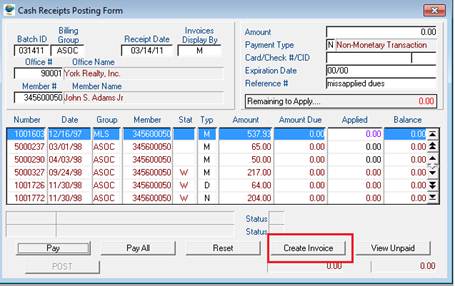
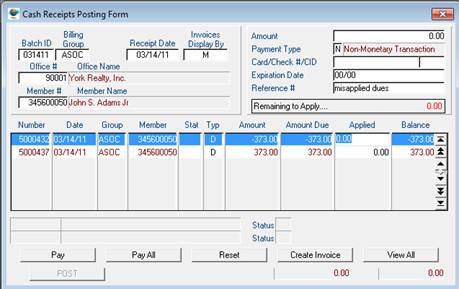
For the incorrectly applied invoice, you will go to the Cash Receipts Posting Form and pull up the incorrectly applied member. You will then fill out the upper portion of the cash receipts posting as displayed. The dollar amount will be 0.00, payment type is N for non-monetary, and the reference number field should be noted as such. Now click the “Create Invoice” button.
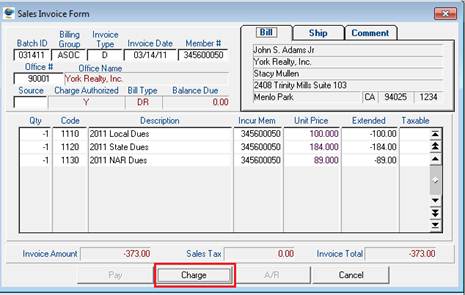
From this screen, we will need to create the “reversal” invoice. Make sure the invoice type at the top matches the invoice type used for the creation of the dues invoice. Click the “Charge” button.
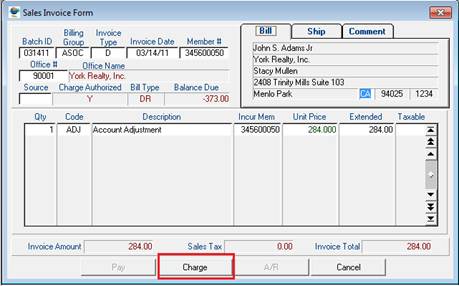
Now you will see that the member has a credit invoice. Our next step is to create the offsetting invoice to apply to the credit invoice. Click the “Create Invoice” button once more to get to the Sales Invoice Form. You will be creating an invoice using your ADJ charge code for the full amount (in this example the full amount is $284.00). Once completed, click the “Charge” button (see below):
This is what you should see (if the member has no other outstanding invoices):
At this step, you will need to click the “Pay All” button. This will apply these two invoices against each other and close this portion out. Now you will need to pay off the correct member. In this instance, you would need to obtain the reference number that was generated to the incorrect member. To do this, you will go to the incorrect member’s A\R, then click the “Receipt History” button. Locate the receipt and jot down the reference number listed. Then peform a normal credit card payment via cash receipts posting, with the exception of filling in the reference number field. Please enter the reference number you jotted down in this field. You will see a warning message stating that the reference number should be blank for all credit card transactions. This is true for traditional credit card payments, however in this instance, you have to enter the reference number or else the credit card will be charged again. Once this step has been completed, run the Member History Update again and the history will be updated accordingly.
If you have any questions or concerns, please contact Magic support at 1-866-730-7115 or via email at
