
| Title: | Creating an e-mail alias account |
| Submitted by: | Rapattoni Magic Software Support |
| Issue: | How can I send broadcast e-mail, or an e-mail billing, from an e-mail alias account? |
Sending broadcast e-mail to hundreds or perhaps thousands of your members is a fast, efficient and cost-effective method of communication. One of the drawbacks of sending out large amounts of e-mail is the onslaught of responses you may receive at your personal e-mail address.
Instead, you can send broadcast e-mail from an alias e-mail account. An alias is a shared e-mail address that multiple staff people can have the ability to monitor. This can also be a real time-saver for those individuals who are currently acting as the center hub, forwarding information manually as it arrives. By creating an e-mail account (for example:
Setting up the alias is a job for your system administrator, since it must be done on your Microsoft Exchange Server. Once completed, any permitted staff member can log on to Microsoft Outlook using the new alias account and send e-mail from the alias.
To set up an e-mail alias account (for system administrators only)
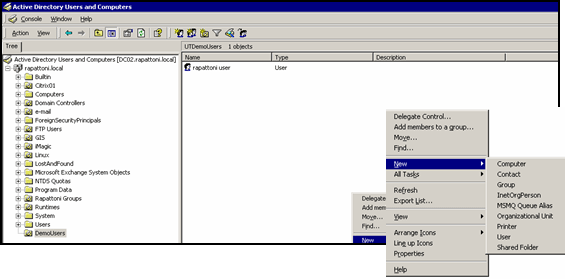
1. On your Microsoft Exchange Server, go to Start > Control Panel > Administrative Tools > Active Directory User/Computers, and create a new user in the Active Directory Users and Computers window.
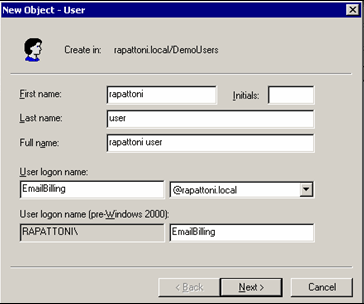
2. Set up the alias account as a new user, and assign an alias name (in the example below, the alias name is
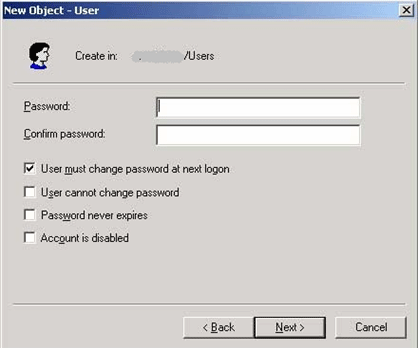
3. Enter the password and other appropriate settings for the alias, and then click Next and complete the process.
4. Once the alias account is created, the system administrator must give permission to staff members to log on to this account. To do this, in the Active Directory Users and Computers window, right-click on the alias user name and choose Properties. Select the Exchange Advanced tab, and click the Mailbox Rights button. There you can add the appropriate users and assign their rights.
Next, there is a one-time setup procedure that needs to be done on each staff member's computer so that they can access the e-mail alias account.
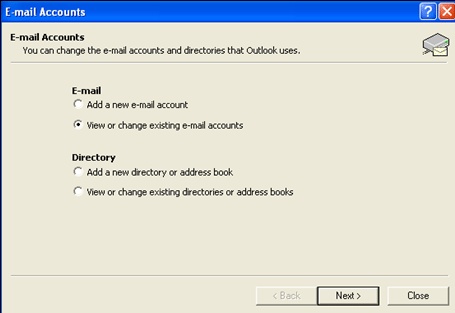
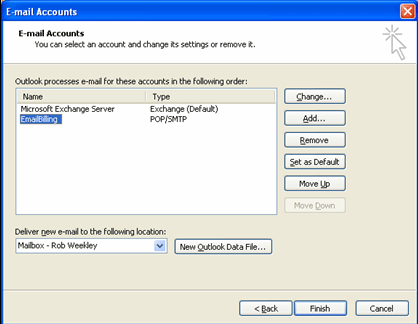
5. On the staff member's computer, open Microsoft Outlook and choose Tools > E-mail Accounts.
6. Select the option View or change existing e-mail accounts and click Next.
7. Select the alias account and click Finish.
This completes the setup. Staff members can select this alias account when logging on to Outlook in order to send e-mail from the alias address. When completing the e-mail billing process in Rapattoni Magic, you can log on to the alias profile when prompted, rather than your own e-mail profile.
For assistance in creating an e-mail alias, please discuss with your system administrator.
NOTE: The related article "Setting up an E-mail Alias (Distribution List)" gives instructions that any user can follow to create a distribution list alias. Another related article titled "E-mail Merge" explains how to extract records from your database in preparation for an Outlook merge. See these and more by visiting the Magic Resource Center at www.rapattoni.com/supp/magic/mrc/default.asp.
