
| Title: | Setting up a Class or Event for Registration on IMS |
| Submitted by: | Rapattoni Magic Software Support |
| Issue: | How can I make a class or event available for registration online? |
Many associations using Rapattoni Magic provide online registration for classes and events to their members. These associations find that their members appreciate this convenience and that it saves their staff a significant amount of time.
If your association has purchased the Internet Member Services module you can easily allow your members to register online. The steps for setting this up are the same for both events and education. We'll use education in the following example:
The first step is to set up the IMS Education service. To begin, go to the IMS Setup Form.
![]()
![]()
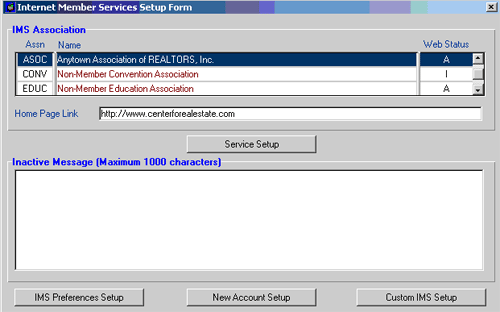
With the appropriate association highlighted, click the Service Setup button to access the Internet Member Services Information form.
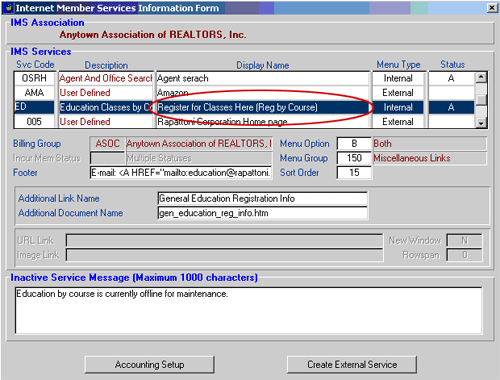
In most cases the education service (Service Code = ED) already exists. If it has not been set up for your association, please refer to the IMS documentation located under the Help menu or call Rapattoni if you need assistance. In the example above, the link that members will click to view and register for classes will display as "Register for Classes Here (Reg by Course)." Also, notice that the "Status" for the service is set to "A" for active.
With the ED service highlighted, click the Accounting Setup button near the bottom of the form.
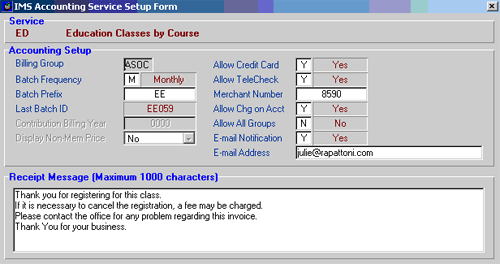
From the IMS Accounting Service Setup Form you must specify accounting settings to be used when members register for classes online. For example, you'll need to select a billing group, choose how often a new batch will be created to handle invoices and receipts, and more. Press F1 for a detailed explanation of each field.
Once your IMS Education service has been set up you can choose the classes you want to make available on IMS.
Go to the Class Information Form and zoom to the desired class (or Event Information Form as appropriate).
![]()
![]()
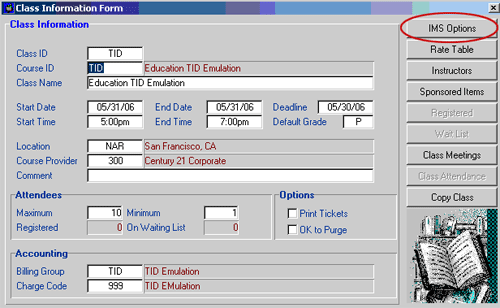
Click the IMS Options button to access the IMS Class Options form.
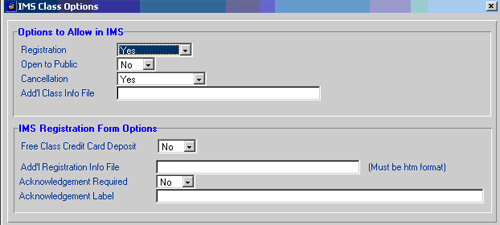
Set the "Registration" field to Yes to specify that you want your members to be able to register for this class online. Do you want "non members" to be able to register for this class? If so, change the "Open to Public" field to Yes. The "Cancellation" field allows you to specify whether you want registrants to have the ability to cancel their registration on their own.
You can provide your members with as much information about the class through IMS as you want to. Simply create a document (such as a Microsoft Word document) and attach it to the class using the "Add'l Class Info File" field. The document will display when your members click the "More Info" link that displays next to the class in IMS. Press F1 to see details on where the file must be placed on your network.
We're almost done! The first field under the IMS Registration Form Options area is "Free Class Credit Card Deposit." If there is no charge for this class, but you would like to require members to provide their credit card information so that you can process a "no show" fee if necessary, set this field to Yes.
You can display additional information to your members, such as "rules and regulations" for cancellation, using the "Add'l Registration Info File" field. In fact, you can require that registrants read the notice and click a button to continue by setting the "Acknowledgement Required" field to Yes. Specify the text that will display on the acknowledgement button, such as "I have read the Cancellation Policy and agree" in the "Acknowledgement Label" field.
Your members can now register for this class online through Internet Member Services!
